
So – why Honeybook? I used to hand deliver paper contracts for clients to sign, wonder whether or not my emails had been read, and accept payments through a zillion different interfaces…. *aka total nightmare*
Disclosure: Some of the links in this post are affiliate links and if you go through them to make a purchase I earn a commission. Keep in mind that I only share about companies that I use, believe in, and absolutely love!!
Everything was bananas to keep track of. My wall-sized white board worked JUST fine – or so I thought – until I would accidentally smudge an important line of info with my butt while walking by… and then cry in the corner in a frustrated state of misery and self-pity. (Sad. so sad). BUTTTTT (you knew that was coming), then I got Honeybook! And my life would forever be more organized, more streamlined, and have a much prettier user interface (and zero butt smudges).
Why Honeybook?
I get it.
Investing in a maybe-not-100%-necessary customer relationship management (CRM) system is a wishy washy thing:
do I need this? or do i need a new lens? maybe a fanny pack from lululemon cause it’s awesome and I can put spare batteries and SD cards and my phone and a snack in it? (the answers are, of course, yes, yes, and yes).
Here’s my honest opinion of Honeybook +why I think you should splurge and get it! And – if you already have it – some of my best tips and workflow hacks to save you time!
PSSSTTTTT – If you don’t already have Honeybook, you can get a SUPER SWEET DEAL until Jan 31, 2021! Scroll to the bottom of this post for the discount code!
Behind the Scenes Look at my Workflow
If you feel like you spend 2 hours a day sending emails – stop. Because there’s a wayyyy easier and more efficient way to keep up with client communication and stay on track!
Enter: workflows.
(note: I use the following workflows after a client has booked me for wedding photography!)
Honeybook workflows are fully customizable, triggered events that you can attach to any client project. Your workflow will automatically send emails, brochures, and questionnaires to your clients on a pre-specified date.
You can also set reminder “tasks” for yourself. You can get a reminder on your desktop or phone for things like sending thank you cards or review requests.
Setting up a Honeybook Workflow
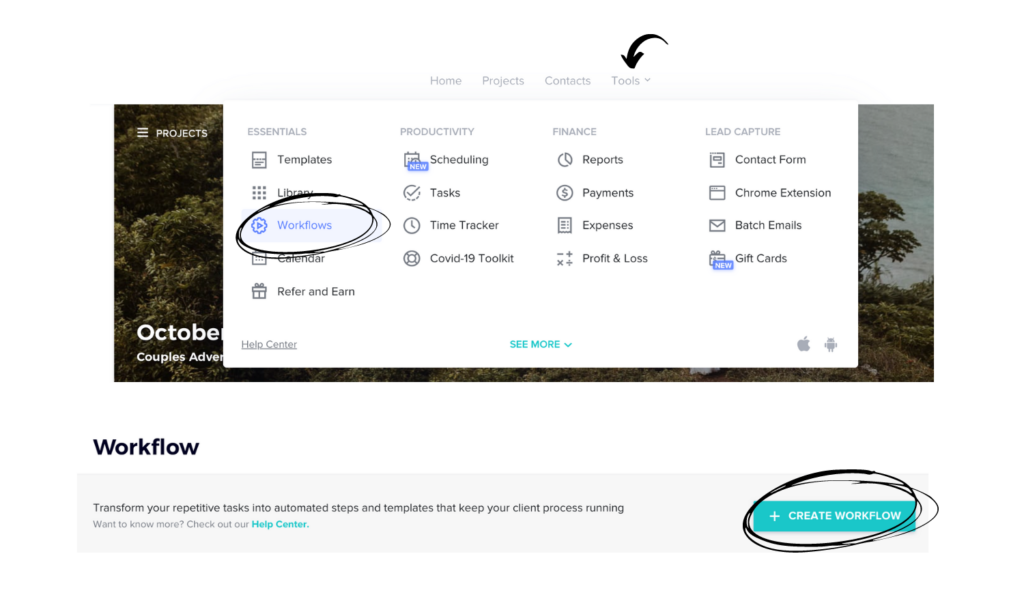
To set up your first workflow, log into Honeybook. Then go to “Tools”, then “Workflows”. From there, click on “Create Workflow”.
Because you can customize your workflows, you can use them for basically anything. I mainly photograph weddings, elopements and couples, so I have separate workflows for each. My wedding workflow is by far the most detailed, so I’m posting here as an example!
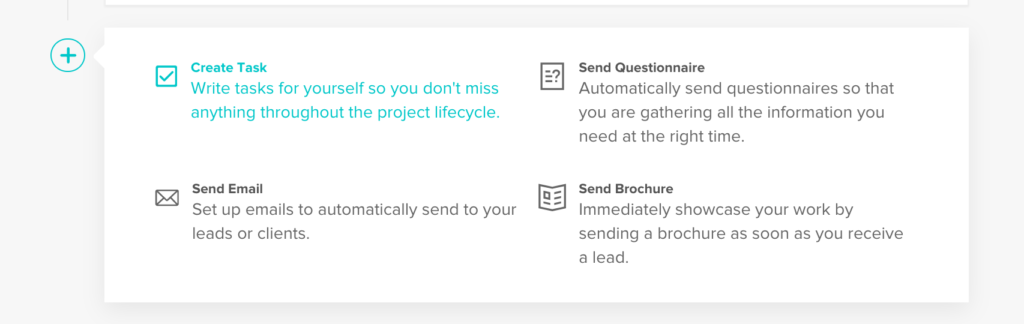
You can add your own workflow title it so it makes sense for the client group you’ll be using it for. (Mine is just titled “Wedding Workflow”). From there, you can create steps by clicking the “+” sign and adding whichever option is relevant for you.
I end up sending a lot of emails and correspondence for my wedding workflow (and you might too!)
I recommend doing a brain dump on paper first and then sorting everything into the appropriate steps. An easy hack is to write every separate item you might need to include on a post it. Then, arrange your post its into a timeline of sorts. Once you have everything laid out, then you can go ahead and start inputting your steps into your workflow!
Adding Steps to Your Workflow
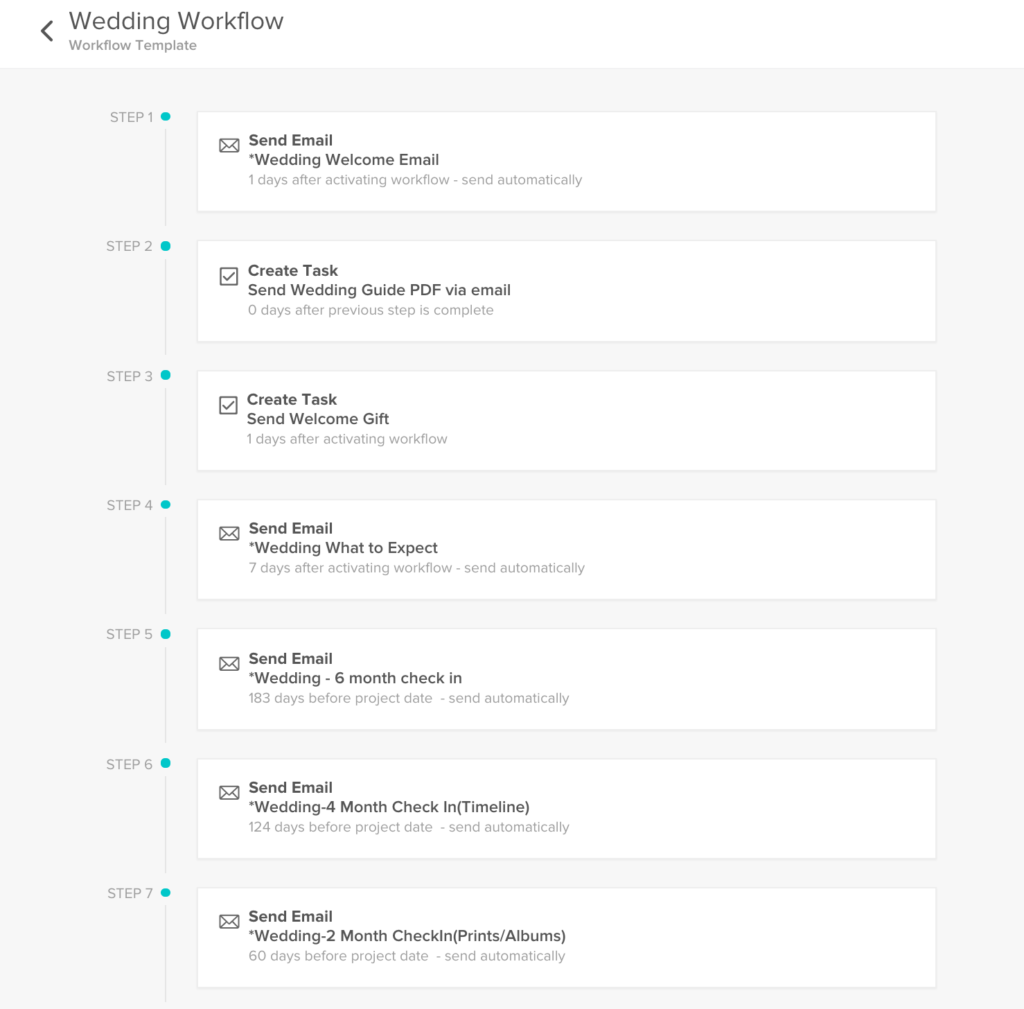
If you look at Step 1 in the above image, you’ll see that it automatically sends my “Wedding welcome email”. This happens as soon as I activate the workflow on a client’s project within Honeybook. Once a client pays the retainer and signs the contract, all I have to do is activate the Wedding Workflow on their project. Then the sequence is automatically started!
Step 2 and 3 are “tasks” – a reminder for me to send them my wedding guide and gift.
Step 4 is another automated “What to Expect” email. It gets sent 7 days after the initial welcome email was sent. It outlines everything they should expect leading up to (and after) their wedding day.
Every email that I have in my Honeybook workflow is saved as a template. I write the emails once, and set up the workflow once. This saves me HOURS of time!
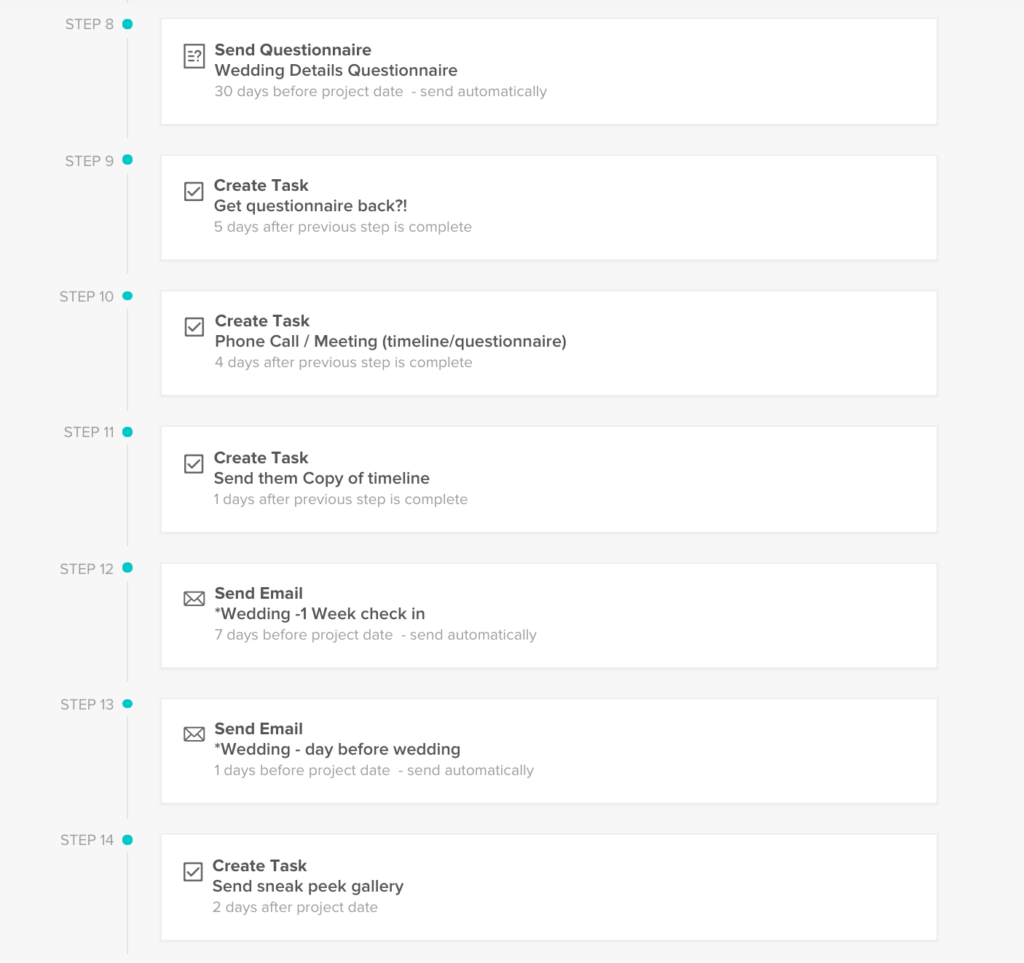
You can create all of your email and questionnaire templates ahead of time. Then you can add them as steps to your workflow. On a pre-specified date, your clients will receive an email template, and if you need it, with a questionnaire attached. (See Step 8)
Adding email and questionnaire templates
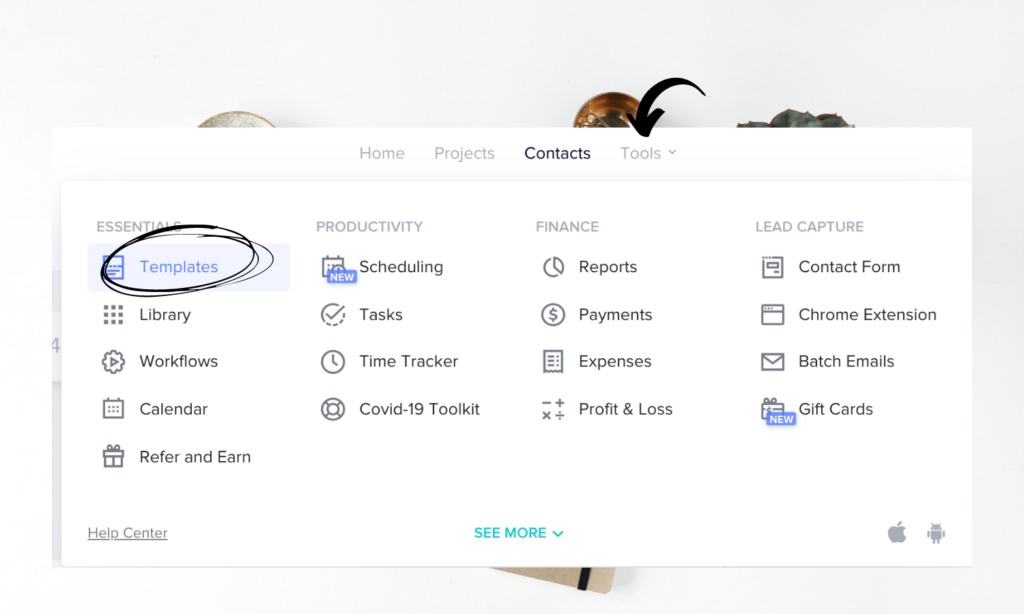
Once you’re logged in to Honeybook, go to “Tools” from the top menu bar and select “Templates” from the drop down menu.
Once you’re in the “Templates” screen, you’ll have access to add and save your own emails, questionnaires, brochures, etc! You don’t have to do this all at once, though. I generally copy/paste an existing email and then add in hyperlinks to price guides, helpful info, Pinterest boards, or anything else that I may need to send to clients. Once I’ve created an email template, it saves automatically and can be titled whatever you like.
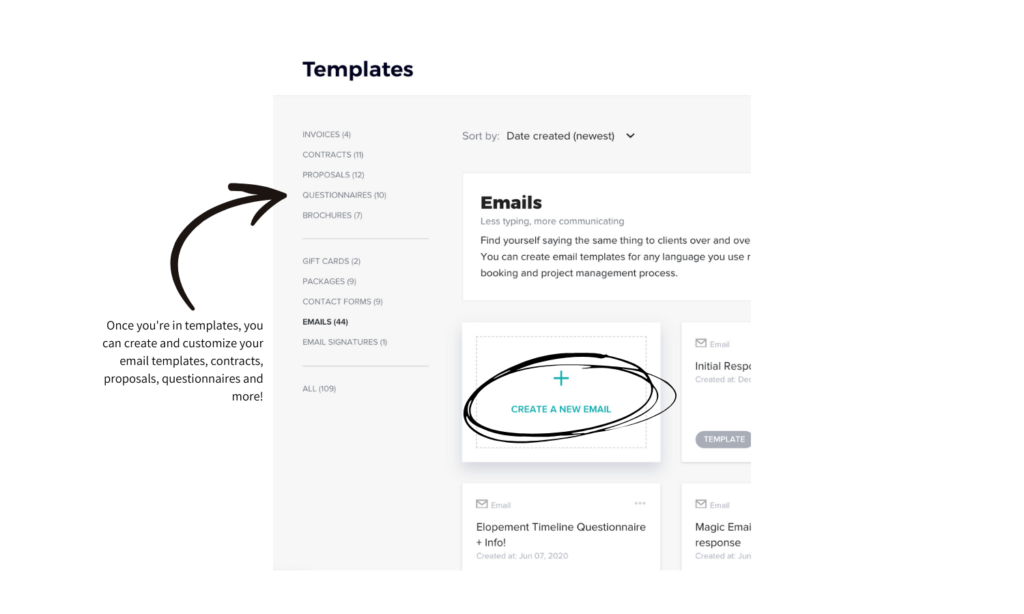
You can also do the same and create templates for contracts, proposals and questionnaires. That way, you do the work once, and just set everything to automate!
Back to the workflow!
On Step 9, I’ve also put a “task” for myself to follow up 5 days after the questionnaire is sent. That allows me to make sure they’ve filled it in and I have a copy printed before the next step.
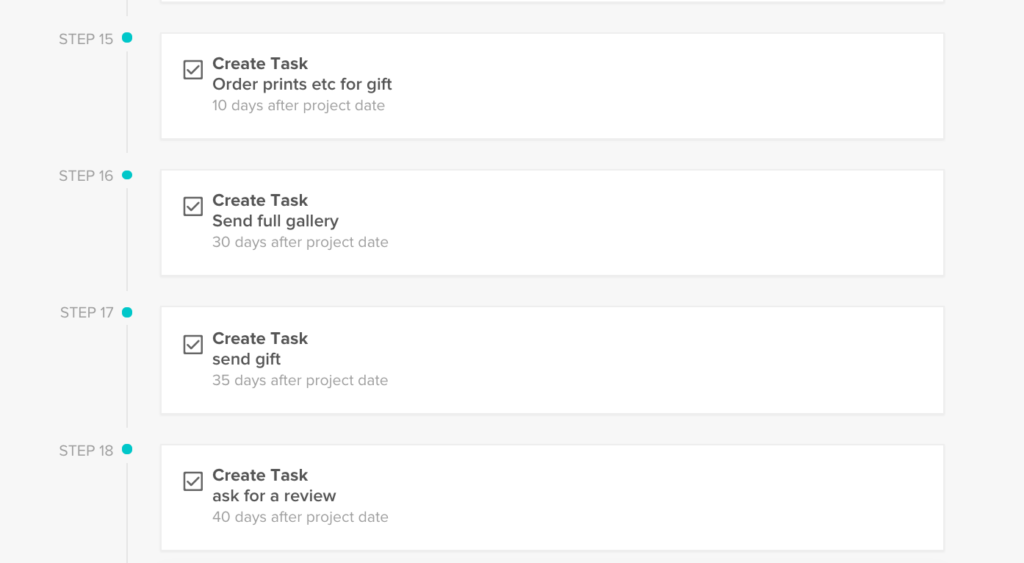
I have a full 18 steps in my wedding workflow. You can make yours as long or as short as you need to!
Once you have all of your steps set up, click “save” in the top right corner. Now your workflow is all ready to use!
Activating Your New Honeybook Workflow on A Client Project
Once your workflow is complete, go to the client project you want to use it for. On the right hand side of their project file, you’ll see notes, time tracker, tasks, and workflow in the toolbar. Click on “Workflow” and you’ll be able to activate your brand new workflow!*
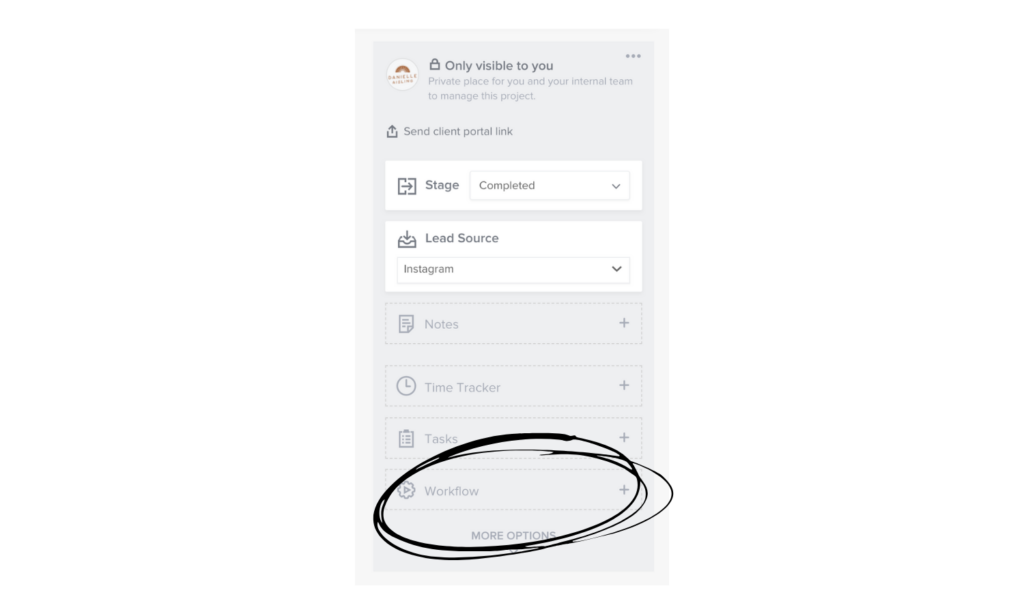
*A note of caution. Once you activate your workflow, it’ll immediately start sending emails if you have your steps set to “send 0 days after activating workflow”. Referring back to Step 1, you’ll see that I put “send 1 day after activating workflow”. That way, if I accidentally add the wrong workflow or decide I need to send another email first, I have a day to do it!
For those of you who have Honeybook already, try out workflows if you haven’t already! It seriously saves so much time! It’s well worth the hour or two it’ll take to set up your email templates and workflow steps.
Don’t have Honeybook but have been thinking about investing in it? Keep reading!
Honeybook Price – Is It Worth It?
Honeybook (or any CRM) for your business is a thing that we can get by without.
But here’s the thing: once you try it, it’s something that you can’t live without.
It’s not always easy to invest in ourselves, whether it’s time, money or effort. But you ARE worth the time, money, and effort. I promise.
Investing in yourself is, well, exactly that: an investment.


[…] can also learn all about creating a more efficient workflow with Honeybook in this […]
[…] If you liked this post, you might also love Top 5 Contact Page Must Haves or How to Create an Efficient Workflow with Honeybook! […]
[…] If you liked this post, you might also enjoy How to Save Time With Workflows! […]
[…] you liked this post, you may also like Creating Efficient Workflows with Honeybook, or My 5 Step Morning […]